With my electric Herald saga on hold with a Mosfet error (that’s a technical term not often associated with Heralds), a more pressing matter reared its head. I was about to take Dolly my Triumph Dolomite for a blast when I got a big whiff of petrol.

Closer inspection revealed my hard earned cash dripping from the tank onto the floor of the barn.
What to do? With a refurbished tank costing 350 smackers and welding petrol tanks too hazardous, I decided to fi x it using Frost’s excellent POR15 resin lining kit. I used this ages ago to reseal my dual-fuel Fergie tractor tank’s separate compartments without cutting the tank in half. It worked then, why not now?

The job is simple but needs patience, care and space. It’s also vital to keep the resin from gunking up outlet pipes and screw threads, etc. You could over-seal your tank. I used a bit of bent wire just the right diameter to plug the fuel outlet from inside the tank and held it in place with a card blank over the gauge orifice.
Clean and dry
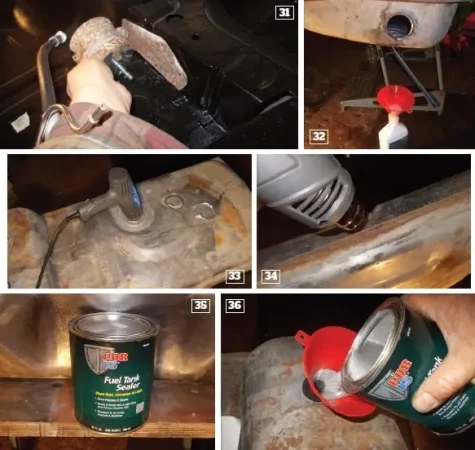
First the tank must be degreased using hot water and the industrial strength cleaner provided. Leave it a day to soak everything off. Next, any rust and corrosion has to be removed or neutralised. This takes another day to create a firm base for the resin.
After more rinsing and drying – including using a paint stripper gun – it was finally time to apply the resin. With the outlet plug in place, all the tinworm holes were covered externally with gaffer tape to stop drips and all the orifices sealed. The tin of resin doesn’t seem big but the 900ml sloshed happily all round the inside of Dolly’s 12-gallon tank, coating every nook and cranny. Gloves and eye protection are strongly recommended for this – the resin doesn’t care what it sticks to and turning the tank over to get the new lining into all the corners and seams does result in some of it escaping.

After coating the tank internal surfaces thoroughly all the excess resin had to be poured out. I hate waste but you don’t want a big wedge of plastic left in the bottom of the tank. I also added my own tweak to the process by covering the outside corners with glassfibre tape left over from a canoe build and fixing it with the surplus resin to make sure the weak points were covered inside and out.
After a quick clean up and respray with ‘tough black’ paint, which I use for most general protection jobs, I have a ‘new’ tank and Dolly is back in business!

(Thanks to Robert and Practical Classics Magazine for this Article.)
What you need:
– POR15 Cleaner Degreaser (was Marine Clean)
– POR15 Metal Prep (was Prep and Ready)
– POR15 Tank Sealer
– Or you can buy a complete Fuel Tank Repair Kit which includes all three steps that you need , depends on the size of your tank.