1 – Upon opening the bonnet, you want to remove any loose grime leaves and dead squirrels that are trapped in the grill or vents. Using a vacuum cleaner on blow does a good job, but compressed air with a Blow Gun, a leaf blower, or a wire brush will work just fine. For cleaning small vents and corners a Mini Vacuum Attachment Kit is useful.
2 – Next, start the car and let it run for a few minutes. The engine should be warm but not so hot that you cannot lay your hand on it.
3 – Now turn the engine off and block the air intake to prevent water from entering the engine. If the air filter has an opening, plug it with a rag or fit a plastic bag over the opening with a rubber band. You may have to follow the air duct to the front grill to find the opening.
If you own a classic car with a distributor, you may want to cover it with a plastic bag or aluminium foil to keep it dry. Newer vehicles have sealed coil packs and ignition modules. Over time, seals can become brittle and crack. If your vehicle is five or more years old, consider covering coil packs and ignition modules with aluminium foil before cleaning.
4 – Now spray the warm engine liberally with an alkaline-based cleaner. We like Frost Chassis Clean or POR15 Cleaner Degreaser.
We do not like and do not recommend acid-based engine cleaners. Avoid getting engine cleaners on exterior paintwork. Let Chassis Clean soak on the engine for about 3 minutes, during this time, use Nylon Engine Cleaning Brushes or Wire Brushes Set to get into all the nooks and crannies.
6 – Now go back and inspect for any remaining grease or grime spots that might require special attention. If you find any, spray and wipe the spot again with Frost Heavy Duty Citrus Degreaser aerosol, scrub down with a Scuff Pad and rinse.
The Frost Heavy Duty Citrus Degreaser aerosol will remove stains, coatings or deposits of oil, grease and dirt. To remove remaining dirt and fuel stains from the carburettor use Frost Carb Cleaner Aerosol.
7 – After the final rinse, blow the engine dry with a vacuum cleaner in reverse. If you do not have a dryer or compressed air, remove the rag or plastic bag covering the air intake and start the vehicle. Let it idle for about 5 minutes.
Now the engine is clean and ready. If you want to repaint your engine, read further below and see how Ben (FunRover.com – Thanks Ben!) repaint the Defender’s Engine with POR15 Engine Enamel (in Buick Green).
Engine Painting

The TD5 rocker cover has been polished up and cleaned, so now it’s the blocks turn for some attention. First off, all holes are plugged and bolts are temporarily placed back into their holes.

Look how clean that head is! Took a lot of work, but the results are worth it! Now using a bottle of brake cleaner, the block was throughly scrubbed down and agitated with brushes.

This is why it’s so important! Even after 3 wash downs already, there’s still dirt and oil left behind!

I’m using POR 15 Engine Enamel from Frost.co.uk to paint the block, it is recommended that bare aluminium surfaces should be treated with POR-15 Metal Prep first before painting.

Then blown down with the air gun to get rid of any final bits of debris and moisture that might effect our paint.

Almost ready to paint, I keyed off the surface with a 3M scrotchbrite pad (scruff pads), just for a little extra adhesion!

Finally! Painting time! I’m using a good quality brush and POR 15 Engine Enamel from Frost. It’s designed specifically to be used on engine blocks so will withstand higher temperatures and comes in a selection of colours. I’ve chosen Buick Green, which is as near as makes no difference to the final build colour, Pastel Green. This colour has become ever so popular recently, however, I bought mine about a year ago. Oh well, this is one Defender that isn’t just following the crowd!
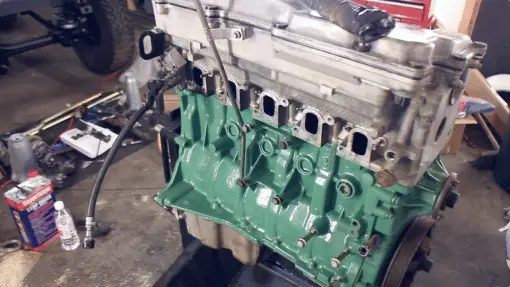
Looks good! Need to leave this 6 days to fully cure before starting the engine, but we can be on with putting it back in over the next week!