(Words and Photos: Russ Harvey, Minor Monthly Magazine, October 2009 issue)
Tools required:
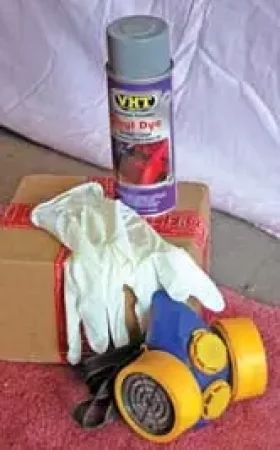
– Masking Tape and an Old Sheet
– Gloves
– Mask
– 1 x VHT Penetrating Vinyl Colour Dye Aerosol (325ml)
As you are aware I am currently rebuilding my pick-up BMF 148H and I needed to deal with the interior, thankfully on the commercials it is a little sparse and with new carpets and seats recovered my thoughts turned to the headlining. I have the original headlining beige/cream with matching sun visors. These items tend to suffer after at least 30 odd years of grime, often being badly tobacco stained too. So even after a good clean they never look good and often the only alternative is to buy a new one. Well I decided to put a product from FROST (www.frost.co.uk) to the test. They produce VHT Penetrating Colour Dye for vinyl and carpeting.

1. So this will be a step-by-step guide to renovating your interior. I will also run a further workshop guide on installing the headlining at a later date as I will observe and photograph my good friend Godfrey Crew.
This paint will work on seats too but I have not tried that. What the instructions say: – VHT Penetrating Colour Dye is a one-step process that restores or changes the colour of any vinyl upholstery, seats and trim, or the “short nap” carpeting. It is ideal for use on stiff or pliable vinyl, simulated leather or plastic. VHT Penetrating Colour Dye is not paint but a true dye, which permanently changes the colour. It is extremely resistant to cracking or fading. It also WARNS that it is not suitable for use on cloth or fabrics.

2 & 3. After removal firstly the headlining and visors need to be cleaned thoroughly to remove any grease and as much dirt as possible. For this I used and old nail brush with some concentrated washing up liquid and a lot of elbow grease! You will be surprised how clean they get but you also notice lots of stains that simply can’t be removed.

4. Allow the headlining and visors to dry thoroughly, ideally hang the headlining and leave overnight, the same really applies to the visors too.

5. Cover the area where you intend to spray the lining and visors with a large sheet, I found it was easy to hang a sheet on a wall, but it needs to be secured. The headlining can then be placed on the sheet. Use some masking tape on the very edges to secure it, as this will not be seen once installed. I used an additional support through the interior light hole to secure it to the wall.

6. The visors need to be suspended or you will need to spray one side at a time. Note you need to mask off the chrome end and shafts of the visors mounts to stop the over spray, if they’re pitted and rusted sand them down and paint them black or silver

7. You are now almost ready to apply the paint. Make sure you have a mask and ensure the spraying area is well ventilated. I also recommend that you use disposable gloves. Shake the paint as directed on the can and test the paint spray before you apply it to the lining. When you are confident apply light strokes of paint to the edges and the seams first

8 & 9. Build up the paint thinly until the stains disappear and even coverage is obtained. Leave to dry before moving at least overnight, it does still feel tacky for a long time. I think you will agree the coverage of the grey colour I selected is good.

10 & 11. The headlining and visors are really enhanced by the light grey and as you can see by these close up images the grain is still visible and the items really do look very fresh and almost like brand new.

12. The difference in these 2 visors is plain for all to see, so if your interior needs brightening up then this is worth a go. All that remains is to refit the headlining in place sadly BMF is nowhere ready to have it fitted so that will keep for another workshop feature.
This VHT Penetrating Colour Dye for vinyl is a great product and really does do exactly what it says on the tin! Next month I am back in the workshop, this time painting a canvas tilt that renovates, changes the colour and waterproofs it all in one!