Remove, flush, seal and future-proof your fuel tank at home. How To Restore a Classic Car Fuel Tank.

Classic fuel tanks can rust readily. This quite often happens from the inside out, so you might know nothing about it until external symptoms start to manifest themselves. Petrol leaks are the most extreme example, signifying that the corrosion has completely penetrated the tank’s structure. A long time before this happens, though, the petrol will start to be contaminated with rust particles. Larger particles will block fuel filters; smaller particles may find their way into the carburettor and clog jets. If you find either, the tank is the most likely source.

The problem is exacerbated by leaving a classic standing for long periods of time. Modern petrol doesn’t help, either, as the ethanol it contains absorbs water during long term storage and speeds up corrosion.
Of course, you don’t have to wait until symptoms appear before you take action. If caught early enough, it’s possible to use a specialised sealer to reclaim a rusty tank and avoid the expense of replacement or refabrication. Simply stripping the inside of the tank will initially cure the problem – but it won’t prevent rust from coming back. For complete future-proofing, it needs to be treated with a tank sealer.
Sealers have a mixed reputation as early versions proved to be incompatible with modern petrol. The latest POR 15 system from the USA, however, is a safe bet. American fuel has far higher levels of ethanol than ours, so it should resist anything supplied on UK forecourts for the foreseeable future. Kits like the one we’re using in this feature are available in various sizes from Frost from £42.49 including VAT (01706 658619, www.frost.co.uk). Removing the tank provides a good opportunity to replace dodgy fuel lines, filler and breather pipes, filters and tank seals. Remember to clear any rusty silt out of the fuel line before you connect it back up.

1. Clean outside
Tanks located under the car have a hard life. Give the exterior a preliminary clean and degrease. Wait until absolutely all fuel traces are removed (see step 6) before using a wire brush or a scraper.

2. Remove fuel sender
Senders are usually attached with a circle of screws or a locking ring. If it’s the latter, a good dose of penetrating oil will usually be needed to release it. Fit a new rubber seal on reassembly.

3. Apply duct tape
Seal all the tank’s orifices except the filler with duct tape, including fuel gauge sender aperture and fuel pipe connections. Ensure the tape is firmly stuck down to avoid leakage in the following steps.

4. Add degreaser
The POR 15 kit includes a degreaser that removes all traces of old fuel and gunge from the inside of the tank. Dilute it 1:1 with warm water and pour it in. Seal the filler neck with more duct tape.

5. Shake vigorously
Turn and shake the tank vigorously so the degreaser coats all surfaces. Keep doing this at regular intervals for at least half an hour. Drain and repeat with fresh degreaser until it comes out clear.

6. Rinse out
Remove all the duct tape. Rinse out the tank several times with a hosepipe to remove all traces of degreaser from the inside and outside. Be thorough. Drain as much water out as you can afterwards.

7. Add rust remover
Seal the tank again with duct tape. Add the POR 15 Metal Prep solution without diluting. It contains phosphoric acid, so wear safety glasses and gloves. Wash splashes off your skin with cold water.


9. External rust removal
Usually when a car is jump started from a Battery Booster or Jump Start or another car with Jump Leads, it is driven long enough to fully recharge the battery. The length of time to fully recharge the battery depends on the amount of discharge, the amount of surplus current that is diverted to the battery, how long the engine is run, engine speed, and ambient temperature

10. Rinse and dry
Rinse the tank thoroughly inside and out. Try to drain as much water out as possible. It now needs to dry completely. Leave it in the sun or near a heater for a day-or-two, turning it regularly.

11. Add tank sealer
Reseal the tank apertures with duct tape and pour the POR 15 Tank Sealer through the filler neck. Seal the filler neck. Follow the provided instructions to calculate the quantity of Tank Sealer to use.


13. Paint exterior
Now’s an ideal time to paint the outside of the tank. Chassis paint brushes on nicely and provides a suitably thick and resilient coating. Fit the fuel gauge sender and the fuel pickup (if present).
Removal and Refitting Tips
How To Restore a Classic Car Fuel Tank

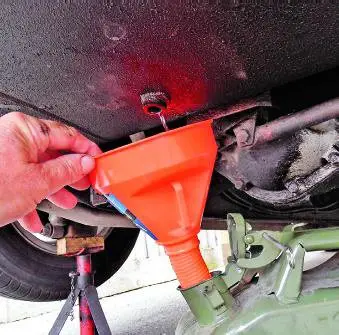
1. Draining
Drain the fuel into a suitable container via the drain plug or fuel outlet – or syphon it out through the filler neck or fuel gauge sender orifice. Dispose of the old fuel safely or save it for cleaning purposes.

2. Removal
Remove the fuel gauge wiring, fuel pipe(s), filler neck pipe and any ventilation pipes. Most tanks are secured by steel straps or bolted directly to the body. Undo the fixings and lift or lower the tank out.
How To Restore a Classic Car Fuel Tank

3. Refitting
Reconnect the wiring. Replace any imperfect pipes and reconnect. Use new hose clips. Fit the drain plug with a new washer. Pour in a can of fresh petrol using a filter funnel. Check carefully for leaks.
What You Need:
– POR-15 Cleaner Degreaser (was Marine Clean)
– POR-15 Metal Prep (was Prep and Ready)
– Or you can buy a complete Fuel Tank Repair Kit which includes all three steps that you need , depends on the size of your tank.